How To Spot Asbestos In Your Older Home

The discovery that your charming Victorian home or mid-century modern treasure might contain asbestos creates an immediate sense of dread that goes far beyond typical home maintenance concerns—suddenly you’re confronting a material that dominated construction for nearly a century but is now recognized as a serious health hazard capable of causing devastating lung diseases including mesothelioma, asbestosis, and lung cancer. The unsettling reality is that millions of American homes built before the 1980s contain asbestos in various forms, from insulation and floor tiles to roofing materials and textured ceiling finishes, where it remains relatively harmless when undisturbed but becomes potentially deadly when renovation work, deterioration, or damage releases microscopic fibers into the air you breathe.

Unlike lead paint or mold that announce themselves through visible evidence, asbestos hides in plain sight, appearing identical to non-hazardous materials and requiring laboratory analysis for definitive identification—making knowledge about where asbestos commonly appears, when professional asbestos testing becomes necessary, and how to safely manage these materials essential information for anyone living in or considering purchasing an older home.

Understanding Asbestos and Its Historical Use

Before learning to identify asbestos, understanding why it was so widely used and when its use declined helps homeowners assess their properties’ likelihood of containing these hazardous materials.

The Asbestos Era in Construction

Asbestos enjoyed widespread use in construction from the early 1900s through the late 1970s, with peak usage occurring between 1930 and 1980. Builders and manufacturers prized asbestos for its exceptional properties including fire resistance, insulation capabilities, tensile strength, and chemical resistance that made it seem like a miracle material for countless applications. The construction industry incorporated asbestos into literally thousands of products including insulation, roofing materials, floor tiles, cement products, pipe wrapping, and decorative finishes.

Regulatory Changes and Phase-Out

The gradual recognition of asbestos health hazards led to increasingly restrictive regulations beginning in the 1970s, with the Environmental Protection Agency banning most asbestos-containing products by 1989. However, these regulations didn’t require removal of existing asbestos materials, meaning homes built before the mid-1980s likely contain asbestos in various forms. Even some products manufactured into the 1990s contained asbestos, making construction date an imperfect predictor of asbestos presence.

Health Risks and Exposure Pathways

Asbestos becomes hazardous when fibers become airborne and are inhaled into lungs, where they lodge in tissue and cause progressive damage over decades. Intact, undisturbed asbestos materials pose minimal immediate risk, but deterioration, renovation work, or damage can release dangerous fiber concentrations. The latency period between exposure and disease development often spans 20-50 years, making the connection between exposure and illness difficult to establish while emphasizing the importance of prevention.

Common Asbestos Locations in Older Homes

Asbestos appears in predictable locations throughout older homes, with certain materials and applications presenting higher likelihood of asbestos content than others.

Insulation Materials

Vermiculite attic insulation, particularly the Zonolite brand manufactured until 1990, frequently contains asbestos contamination from the Libby, Montana mine that supplied much of North America’s vermiculite. This pebble-like insulation appears as gray-brown or silver-gold lightweight material that resembles small stones or Grape-Nuts cereal. Pipe and boiler insulation in older homes often contains asbestos in white or gray wrapping materials that may appear corrugated or smooth. Wall and ceiling insulation in homes built before 1980 may contain loose-fill asbestos or asbestos-containing batts.

Roofing and Siding Materials

Asbestos cement shingles on roofs and siding were extremely common from the 1920s through 1970s, appearing as flat or corrugated panels in various colors. These rigid shingles often exhibit a slightly textured surface and may show weathering or cracking that exposes fibrous interiors. Roofing felt, adhesives, and flashing materials from this era also frequently contained asbestos. The durability of these materials means many remain in service today, often covered by newer roofing layers rather than removed.

Flooring Systems

Vinyl floor tiles manufactured before 1980, particularly 9×9 inch and 12×12 inch tiles, commonly contained asbestos for strength and fire resistance. The backing paper on vinyl sheet flooring, mastic adhesives securing tiles, and underlayment materials also frequently contained asbestos. These materials often remain hidden under newer flooring layers, creating exposure risks during renovation projects that disturb multiple flooring generations.

Textured Surfaces and Finishes

Popcorn ceilings and textured wall finishes applied before the mid-1980s frequently contained asbestos for fire resistance and texture. These materials appear as bumpy, cottage cheese-like ceiling finishes or swirled wall textures that were extremely popular during the 1950s-1970s. Joint compounds used in drywall finishing may also contain asbestos, particularly in homes built before 1980.

Other Common Locations

Asbestos appears in numerous other locations including furnace ducts and duct tape, gaskets around wood-burning stoves, artificial fireplace logs and embers, cement panels around fireplaces and wood stoves, door gaskets in furnaces and ovens, and heat-resistant fabrics including ironing board covers and hot pads. HVAC systems in older homes may contain asbestos in ductwork insulation, furnace cement, and tape materials.

Visual Identification Limitations

While certain visual characteristics suggest possible asbestos content, definitive identification requires professional laboratory testing—appearance alone cannot confirm or rule out asbestos presence.

Materials That May Contain Asbestos

Fibrous insulation materials appearing fluffy, crumbly, or dusty may contain asbestos, particularly white or gray materials showing deterioration. Rigid cement-based products including shingles, siding, and panels manufactured before 1980 should be suspected of containing asbestos. Resilient flooring materials from this era, particularly vinyl tiles and sheet goods, warrant suspicion. Textured ceiling and wall finishes applied before the mid-1980s frequently contain asbestos.

Deterioration and Damage Warning Signs

Materials showing crumbling, flaking, or powdering indicate deterioration that may be releasing asbestos fibers if the material contains asbestos. Water damage, physical impact, or wear from normal use can disturb asbestos-containing materials and create exposure risks. Visible damage to suspected asbestos materials should prompt immediate professional assessment rather than DIY investigation or attempted repairs.

Why Visual Identification Fails

Asbestos-containing materials appear virtually identical to non-asbestos alternatives, making visual identification unreliable. Manufacturers produced both asbestos and non-asbestos versions of many products during transition periods, meaning identical-appearing materials from the same era may or may not contain asbestos. Only laboratory analysis using polarized light microscopy or transmission electron microscopy can definitively identify asbestos presence and concentration.

When Professional Testing Becomes Necessary

Certain situations require professional asbestos testing to protect health and ensure regulatory compliance during renovation or maintenance activities.

Pre-Renovation Assessment Requirements

Any renovation, remodeling, or demolition work in homes built before 1990 should include asbestos testing of materials that will be disturbed. This testing protects both occupants and workers while ensuring compliance with environmental regulations governing asbestos handling and disposal. Many states and municipalities require professional asbestos surveys before issuing renovation permits for older buildings.

Suspected Material Deterioration

Crumbling, damaged, or deteriorating materials suspected of containing asbestos warrant immediate professional testing and assessment. Deteriorating asbestos materials release fibers that create ongoing exposure risks requiring professional remediation rather than DIY repairs. The cost of professional testing pales compared to health risks from asbestos exposure or regulatory penalties for improper handling.

Home Purchase Inspections

Buyers purchasing homes built before 1990 should consider asbestos testing as part of due diligence, particularly when planning renovations or when obvious suspect materials are present. Professional asbestos surveys identify materials requiring special handling, inform renovation planning, and provide documentation supporting property value negotiations when extensive asbestos remediation may be required.

Post-Disaster Assessment

Fires, floods, earthquakes, or other disasters that damage older homes may disturb asbestos-containing materials and create exposure risks. Professional assessment after significant damage helps identify necessary precautions and remediation before cleanup and reconstruction begin.

Professional Testing and Assessment Process

Professional asbestos testing follows standardized protocols ensuring accurate identification while minimizing disturbance of potentially hazardous materials.

Qualified Inspector Selection

Choose certified asbestos inspectors holding appropriate state licenses and accreditation from organizations like the American Council for Accredited Certification. These professionals possess training in sample collection, safety protocols, and building assessment that ensures accurate testing without creating unnecessary exposure risks. Verify inspector credentials and insurance coverage before allowing sampling work.

Sampling and Laboratory Analysis

Professional inspectors collect small samples from suspected materials using techniques that minimize fiber release, then submit samples to accredited laboratories for microscopic analysis. Laboratory results identify asbestos presence, fiber type, and concentration percentages that inform risk assessment and remediation planning. Reputable inspectors provide detailed written reports including sample locations, laboratory results, and recommendations for managing identified asbestos materials.

Cost Considerations

Professional asbestos testing typically costs $400-800 for residential properties, with pricing varying based on home size, number of samples required, and regional labor rates. While this represents a significant expense, the investment provides essential information protecting health while supporting informed decisions about material management and renovation planning.

Safe Management of Asbestos Materials

Once asbestos materials are identified, appropriate management strategies balance health protection with practical considerations and regulatory requirements.

Leave Undisturbed When Possible

Intact, undisturbed asbestos materials in good condition often pose minimal immediate risk and may be safely left in place with periodic monitoring for deterioration. This approach, called “operations and maintenance,” proves most cost-effective when materials aren’t damaged and no renovation work is planned. Document asbestos locations and condition through photographs and written records, informing household members and future contractors about asbestos presence.

Professional Remediation Requirements

Damaged asbestos materials or those requiring removal for renovation projects demand professional remediation by licensed asbestos abatement contractors. These specialists possess training, equipment, and expertise for safely removing or encapsulating asbestos materials while protecting occupants and complying with environmental regulations. Never attempt DIY removal of identified asbestos materials regardless of quantity or location.

Encapsulation and Containment

Some situations allow encapsulation where professionals seal asbestos materials with specialized coatings that prevent fiber release. This approach costs less than removal while effectively managing exposure risks when materials are stable and not requiring removal for other reasons. Encapsulation requires periodic inspection ensuring coating integrity remains intact.

Identifying asbestos in older homes requires understanding where these materials commonly appear, recognizing when professional testing becomes necessary, and knowing how to safely manage identified asbestos through appropriate professional services. While asbestos presence understandably concerns homeowners, proper identification and management through qualified professionals transforms this hazard from a frightening unknown into a manageable situation that protects both health and property values. The key lies in respecting asbestos dangers while avoiding panic—most asbestos situations can be safely managed through appropriate professional intervention without requiring immediate emergency response or prohibitive expense.

How Attic Mold Forms and How to Treat It: A Homeowner’s Guide

Did you know that attic mold can begin growing within just 24–48 hours of moisture intrusion? Attics are often overlooked, yet they’re breeding grounds for mold—thanks to wood surfaces, poor air circulation, and hidden leaks. Not only can attic mold harm your home’s structure, but it may also affect air quality in your living areas. Let’s dive into how attic mold forms, how to treat it, and how to stop it from coming back.

Section 1: What Causes Mold in the Attic?

1. Roof Leaks

Even minor leaks—from damaged flashing, aging shingles, or poor installation—allow water to seep into the attic. Over time, moisture accumulates in insulation and wood, creating the perfect environment for mold to grow. Regular roof inspections and timely repairs are essential to prevent this.

2. Poor or Blocked Ventilation

Attics rely on passive airflow: cool air comes in through soffit vents, rises as it warms, and exits through ridge vents. If vents are blocked (by debris, insulation, or animal nests), air becomes stagnant, leading to condensation and mold formation—especially in winter when warm air hits cold sheathing.

3. Improperly Vented Exhaust Fans

Vent fans from bathrooms, kitchens, or dryers must vent outside—not into the attic. Redirecting them incorrectly introduces warm, humid air into the attic, escalating moisture buildup and mold risk.

4. Warm Air and Condensation

Warm, humid air rising from the living spaces can meet the colder attic environment and condense on wood surfaces and insulation—especially where insulation is thin. This is a frequent contributor to mold growth.

5. Ceiling Openings and Air Leakage

Unsealed gaps around fixtures—like recessed lights, speakers, or plumbing stacks—can allow warm air into the attic. Sealing these gaps is a simple yet effective step to keep attic climate stable and dry.

Section 2: Is Attic Mold Dangerous?

Health Risks

For most people, indoor mold may trigger symptoms like nasal congestion, sneezing, or a persistent cough. However, vulnerable groups—children, the elderly, and those with respiratory conditions—face higher risks, including asthma flare-ups or infections.

Indoor Air Safety

Even if the attic isn’t regularly used, mold spores can migrate into living areas—especially in homes with pressure imbalances or if the attic door is opened. Ensuring proper insulation and sealing can prevent contaminated air from entering your home.

Structural and Energy Damage

Attic mold thrives on wood and insulation—so it can weaken beams, damage sheathing, and reduce energy efficiency. Fixing mold isn’t just about cleanliness—it’s about preventing costly repairs and energy loss.

Section 3: How to Remove Mold from Your Attic

Step 1: Prioritize Safety

Before handling mold, put on safety gear: an N95 or equivalent mask, gloves, and goggles. Contain the area—close attic access and cover floor openings to control spore spread.

Step 2: Clean Small Areas

For small, localized mold spots:

  • Scrub gently with detergent or a mold-specific cleaner.

  • Consider using safe biocides like hydrogen peroxide, vinegar, or mold-specific products that won’t interfere with repainting.

  • Always let treated areas dry fully before repainting or re-insulating.

Step 3: Tackle Large Infestations

If mold spans large areas or is hidden, it’s wise to call professionals. Remediation typically includes containment, air filtration, cleaning, disinfection, and fixing the underlying moisture issue. Costs may range from $1,225 to $3,750, depending on the severity and location.

Step 4: Confirm It’s Fully Solved

Once remediation ends, the team should conduct moisture readings and possibly air sampling to confirm mold levels are back to safe standards.

Section 4: Preventing Future Mold Growth

Improve Ventilation

Ensure balanced intake and exhaust—clear soffit vents and ridge vents, and consider powered attic fans if natural airflow is insufficient.

Seal Gaps and Insulate Properly

Seal openings around fixtures and ducts to prevent warm air from escaping. Add insulation—like 12–15 inches of fiberglass or cellulose—but avoid over-insulating vents, which can block airflow.

Redirect Exhaust Fans Correctly

Make sure dryer, kitchen, and bathroom fans terminate outside—not into the attic space.

Control Indoor Humidity

Keep relative humidity between 30–50% to suppress mold growth. Use dehumidifiers or HVAC systems as needed, and fix any household leaks promptly.

Conduct Regular Inspections

Inspect the roof yearly, particularly after storms. Check the attic for signs of moisture, vent blockages, or insulation shifts. Early detection is key to preventing mold.

Attic Mold Prevention

Attic mold develops when moisture meets a fuel source—like wood or insulation—in a poorly ventilated space. It poses health risks, threatens your home’s structure, and can impact energy use. Tackling it starts with safe, targeted cleanup and ends with improving attic ventilation, sealing, and moisture control.

The Pros and Cons of an EPDM Roof

Did you know that over 20 billion square feet of EPDM roofing have been installed across the U.S.? It’s one of the most popular roofing systems for commercial and flat-roof buildings. But popularity doesn’t always mean it’s the right choice for your needs. In this post, we’ll explore the key advantages and disadvantages of EPDM roofs so you can make an informed decision.

What Is an EPDM Roof?

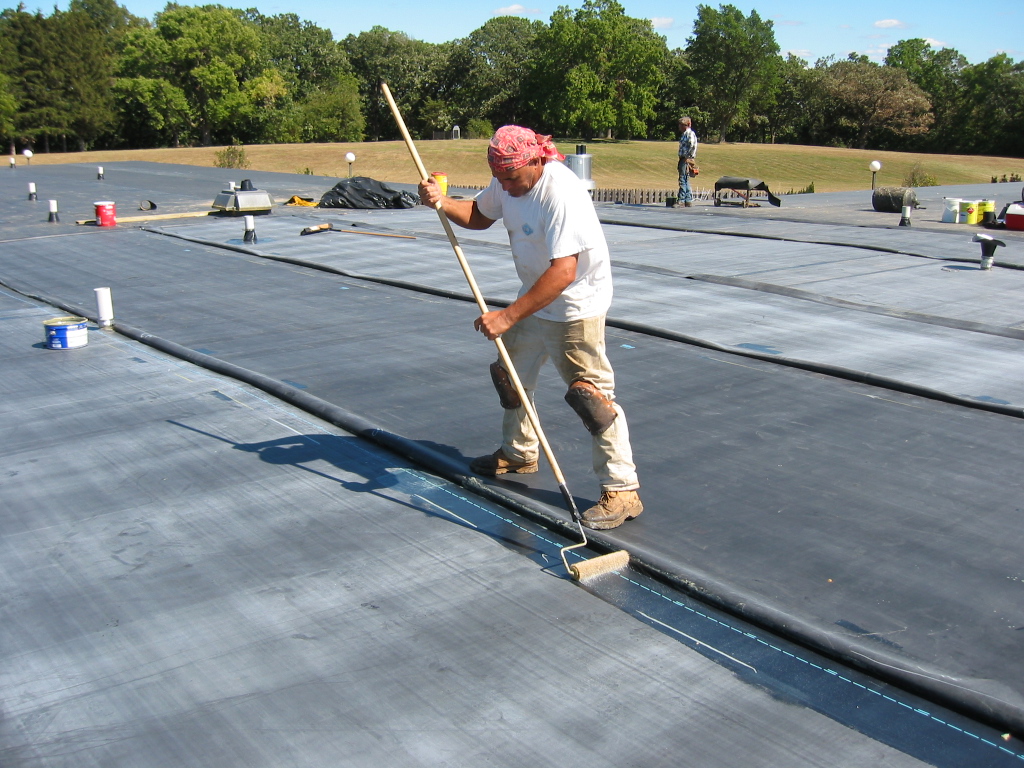
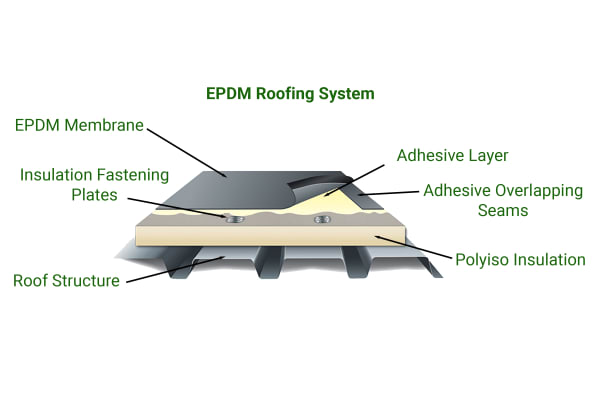
EPDM stands for Ethylene Propylene Diene Monomer. It’s a type of synthetic rubber roofing membrane known for its durability and flexibility. Commonly used on flat or low-slope roofs, EPDM comes in large rolls that are black or white and typically 45 to 60 mils thick.

There are three primary installation methods:

  • Fully adhered (glued down)

  • Mechanically fastened (secured with fasteners)

  • Ballasted (held in place with rocks or pavers)

Its flexibility makes it ideal for roofs that may expand or contract due to temperature changes.

Best Types of Buildings for EPDM Roofing

EPDM roofing is a versatile roofing option, but it’s especially well-suited to certain types of buildings. Its flexibility, durability, and cost-effectiveness make it a go-to choice for:

1. Commercial and Industrial Buildings

Large warehouses, factories, and office buildings often have flat or low-slope roofs, making them ideal candidates for EPDM. The material’s wide roll sizes reduce seams, which helps minimize leak risks on expansive surfaces.

2. Educational and Institutional Facilities

Schools, universities, and hospitals benefit from EPDM because of its long lifespan and low maintenance requirements. White EPDM versions also provide energy savings, which is especially valuable for high-occupancy buildings.

3. Multifamily Housing and Apartment Complexes

Flat-roof apartment buildings often rely on EPDM because it’s affordable, durable, and easy to repair. Property managers appreciate that minor damage can be fixed quickly without replacing the entire system.

4. Residential Flat Roofs

While less common than commercial use, EPDM can be a solid option for homes with flat or low-slope roof designs. It’s not the most stylish choice, but it delivers strong weather protection at a reasonable cost.

Pros of EPDM Roofing

1. Budget-Friendly Roofing Option

EPDM is one of the most cost-effective flat roofing systems available. Installation costs range from $4 to $8 per square foot, which is significantly lower than other materials like TPO or PVC. It also lasts for decades, reducing replacement costs.

2. Long-Lasting Durability

When properly installed, an EPDM roof can last 25 to 30 years or more. It’s resistant to UV radiation, hail, wind, and even extreme temperatures. The material doesn’t crack or deteriorate easily, making it a reliable long-term solution.

3. Low Maintenance and Easy Repairs

EPDM requires very little upkeep. Most damage, such as small punctures or tears, can be patched with simple adhesive kits. This makes it a good option for building owners looking to minimize maintenance time and costs.

4. Environmentally Friendly Choice

EPDM is recyclable, which makes it a greener option compared to asphalt-based materials. Additionally, white EPDM reflects sunlight, helping to reduce cooling costs in hot climates.

Cons of EPDM Roofing

1. Basic Appearance

EPDM is functional but not attractive. It’s typically black (though white versions are available) and has a plain, industrial look. This makes it less appealing for homes or buildings where roof aesthetics matter.

2. Puncture Risks

The rubber membrane can be damaged by falling branches, tools, or heavy foot traffic. Extra protection may be needed in areas that people walk on frequently.

3. Installation Errors Can Lead to Problems

If not installed properly, EPDM roofs can suffer from seam separation or leaks. It’s essential to hire experienced roofing contractors to avoid costly issues later.

4. Shrinkage Over Time

EPDM may shrink slightly over the years, especially if exposed to constant heat. This can cause the material to pull away from edges or flashing, requiring resealing or repairs.

Is an EPDM Roof Right for You?

EPDM roofing is best for:

  • Commercial buildings with flat or low-slope roofs

  • Budget-conscious projects

  • Owners looking for a long-lasting, low-maintenance solution

It may not be ideal for:

  • Sloped residential roofs

  • Projects where curb appeal is a top priority

  • High-traffic rooftop areas

Is an EPDM Roof Right For You?
EPDM offers a reliable, affordable, and eco-friendly roofing solution—but it’s not perfect for every situation. Consider your budget, roof type, and appearance needs before making a decision. Always consult with a certified roofer to ensure EPDM is the right fit for your building.

How Proper Line Marking Improves Traffic Flow and Parking Efficiency

In bustling cities like Toronto, efficient traffic flow and well-organized parking are essential for keeping the city running smoothly. One crucial aspect of maintaining this efficiency is proper line marking. Line marking involves applying clear, durable markings on pavement surfaces to guide drivers, pedestrians, and cyclists. When executed correctly, line marking can significantly improve traffic flow, parking efficiency, and overall safety. In this blog post, we’ll explore the benefits of proper line marking and how it contributes to a well-functioning urban environment.

The Role of Line Marking in Traffic Flow

Proper line marking plays a vital role in directing and managing traffic flow. Some key ways in which line marking improves traffic flow include:

  1. Lane delineation: Clear, well-maintained lane markings help drivers stay within their designated lanes, reducing confusion and the risk of accidents.
  2. Turn lanes and arrows: Marked turn lanes and arrows guide drivers into the appropriate lanes for turning, minimizing last-minute lane changes and traffic disruptions.
  3. Crosswalks and stop lines: Clearly marked crosswalks and stop lines indicate where pedestrians have the right of way and where vehicles should stop, promoting a safer and more orderly flow of traffic.
  4. Cycle lanes: Designated cycle lanes, marked with distinct lines and symbols, provide a safe space for cyclists and help reduce conflicts between cyclists and motorists.

By ensuring that line markings are clear, visible, and properly maintained, cities can significantly improve traffic flow and reduce congestion on their streets.

Enhancing Parking Efficiency with Line Marking

In addition to improving traffic flow, proper line marking is essential for optimizing parking efficiency. Well-marked parking lots and street parking spaces offer several benefits:

  1. Maximizing space utilization: Clear, well-defined parking spaces help drivers park their vehicles correctly, maximizing the number of vehicles that can fit within a given area.
  2. Reducing parking conflicts: Properly marked parking spaces minimize the risk of disputes over parking spots and prevent drivers from inadvertently parking in unauthorized areas.
  3. Improving accessibility: Designated accessible parking spaces, marked with the International Symbol of Access, ensure that individuals with disabilities have access to convenient parking near building entrances.
  4. Facilitating traffic flow within parking areas: Directional arrows and lane markings within parking lots help guide drivers and reduce confusion, promoting a smooth flow of traffic even in busy parking areas.

By investing in proper line marking, property managers and city planners can maximize the efficiency and functionality of their parking facilities.

Maintaining Line Marking for Ongoing Benefits

To ensure that the benefits of line marking are sustained over time, it’s essential to maintain and refresh markings regularly. Factors such as weather, traffic wear, and pavement deterioration can cause line markings to fade or become less visible. When line markings are no longer clearly visible, they lose their effectiveness in guiding drivers and pedestrians.

Regular maintenance, such as repainting or applying new thermoplastic markings, helps keep line markings clear and effective. In some cases, more extensive pavement resurfacing may be necessary to restore the surface and provide a fresh canvas for new line markings.

Working with experienced pavement marking contractors is crucial for ensuring that line marking is applied correctly and in compliance with local regulations. These professionals have the knowledge, skills, and equipment necessary to deliver high-quality, durable line markings that will stand the test of time.

The Benefits of Investing in Proper Line Marking

Investing in proper line marking offers a range of benefits for cities, businesses, and communities:

  1. Improved safety: Clear, well-maintained line markings help reduce accidents and conflicts between vehicles, pedestrians, and cyclists.
  2. Increased efficiency: Proper line marking optimizes traffic flow and parking efficiency, reducing congestion and maximizing the use of available space.
  3. Enhanced accessibility: Designated accessible parking spaces and well-marked pedestrian crossings ensure that individuals with disabilities can safely and easily navigate the urban environment.
  4. Reduced liability: By ensuring that line markings are properly maintained and compliant with regulations, property owners and cities can reduce their liability in the event of accidents or disputes.
  5. Improved aesthetics: Well-maintained line markings contribute to a clean, organized appearance, enhancing the overall aesthetics of streets and parking areas.

Proper line marking and pavement markings is a critical component of efficient traffic flow and parking in cities like Toronto. By investing in high-quality line marking and regular maintenance, cities can improve safety, reduce congestion, and maximize the use of their parking facilities. Working with experienced pavement resurfacing contractors ensures that line markings are applied correctly and in compliance with local regulations, providing ongoing benefits for years to come. As urban populations continue to grow and the demand for efficient transportation and parking increases, the importance of proper line marking will only continue to rise.

The Cost of Ignoring Mold: Structural Damage, Health Risks, and More

Mold is a pervasive problem that can affect homes and buildings of any age, size, or location. However, in cities like Toronto, where the weather is often damp and many buildings are older, the issue of mold growth is particularly prevalent. Ignoring mold can lead to a host of problems, from structural damage to serious health risks, making it essential for property owners and managers to address mold growth promptly and effectively.

Structural Damage Caused by Mold

One of the most significant costs of ignoring mold is the potential for extensive structural damage to your property. Mold thrives in damp, humid environments and can grow on various surfaces, including wood, drywall, and insulation. When left unchecked, mold can grow and cause:

  1. Wood rot: Mold can cause wood to decay, compromising the structural integrity of floors, walls, and roof supports.
  2. Drywall deterioration: Mold can eat away at drywall, causing it to crumble and necessitating costly repairs or replacement.
  3. Insulation damage: Mold growth on insulation can reduce its effectiveness and contribute to higher energy bills.
  4. Foundation issues: In extreme cases, mold growth can even affect a building’s foundation, leading to expensive repairs and potential safety hazards.

Neglecting mold growth can lead to costly repairs and renovations down the line.

Health Risks Associated with Mold Exposure

Another significant cost of ignoring mold is the potential impact on the health of those exposed to it. Mold can release microscopic spores into the air, which can cause a range of health problems when inhaled or ingested. Some common health issues associated with mold exposure include:

  1. Allergic reactions: Many people are allergic to mold spores, experiencing symptoms such as sneezing, runny nose, itchy eyes, and skin irritation.
  2. Respiratory issues: Mold exposure can exacerbate asthma symptoms and cause respiratory infections, coughing, and wheezing.
  3. Neurological problems: In some cases, exposure to certain types of mold, such as Stachybotrys (black mold), can lead to neurological issues, including headaches, memory loss, and mood changes.
  4. Immune system suppression: Chronic mold exposure can weaken the immune system, making individuals more susceptible to other illnesses and infections.

In Toronto, where residents spend a significant amount of time indoors due to the colder climate, the health risks associated with mold exposure are particularly concerning. Ignoring mold growth can lead to ongoing health problems and reduced quality of life for those living or working in affected buildings.

Other Costs of Ignoring Mold

In addition to structural damage and health risks, there are other costs associated with ignoring mold growth:

  1. Decreased property value: The presence of mold can significantly reduce the value of a property, making it difficult to sell or rent.
  2. Increased insurance premiums: If mold growth is left unchecked and leads to significant damage, insurance companies may increase premiums or even refuse to cover the property.
  3. Legal liability: In cases where mold growth affects tenants or employees, property owners may face legal liability for any health issues or damages incurred.
  4. Reputational damage: For businesses, mold growth can lead to negative publicity and damage to the company’s reputation, resulting in lost revenue and customer trust.

Addressing Mold Growth in Toronto

Given the high costs of ignoring mold, it’s crucial for property owners and managers in Toronto to take proactive steps to prevent and address mold growth. This may include:

  1. Regular property inspections to identify potential moisture issues and early signs of mold growth.
  2. Prompt repairs of leaks, cracks, and other sources of water intrusion.
  3. Ensuring proper ventilation and humidity control to prevent mold growth.
  4. Engaging professional mold remediation services at the first sign of mold growth to minimize damage and health risks.

By prioritizing mold prevention and promptly addressing any growth, property owners in Toronto can protect their investments, the health of occupants, and their own financial well-being.

The cost of ignoring mold is simply too high to overlook. From structural damage and health risks to decreased property values and legal liabilities, the consequences of unchecked mold growth can be severe. In a city like Toronto, where many buildings are older and the weather is often damp, it’s especially crucial for property owners to stay vigilant and proactive in preventing and addressing mold issues. By doing so, they can safeguard their properties, protect the health of occupants, and avoid the costly ramifications of ignoring this pervasive problem.

Why epoxy flooring is so popular right now in Toronto

Epoxy flooring has seen a significant surge in popularity across many parts of the world, and Toronto is no exception. Known for its durability, aesthetic appeal, and versatility, epoxy flooring has become the go-to option for both residential and commercial spaces in the city. From garage floors and basements to retail stores and industrial spaces, epoxy flooring offers a wide range of benefits that appeal to a broad spectrum of property owners. But why exactly is epoxy flooring so popular right now in Toronto? Let’s explore the key factors contributing to its rise in demand.

1. Durability and Longevity

One of the primary reasons for epoxy flooring’s popularity is its incredible durability. Toronto’s climate can be quite harsh, with cold, snowy winters and hot, humid summers. These extreme conditions can take a toll on many types of flooring, leading to cracks, wear, and other damage. Epoxy flooring, however, is known for its resilience. Once installed, it creates a hard, protective layer over the concrete, making it highly resistant to wear and tear, chemical spills, and impact.

In areas like garages, where vehicles, heavy tools, and equipment are often present, epoxy flooring stands up to the challenge by providing a tough, long-lasting surface that can handle the weight and friction without showing signs of damage. Homeowners and businesses alike appreciate that epoxy flooring can last for many years with minimal maintenance, making it a smart investment.

2. Low Maintenance and Easy to Clean

In a bustling city like Toronto, where people lead busy lives, low-maintenance flooring is a top priority for many property owners. Epoxy flooring is incredibly easy to clean and maintain, which is a huge draw for homeowners and business owners alike. The smooth, non-porous surface of epoxy prevents dirt, dust, and liquids from penetrating the floor, making spills easy to wipe up and regular cleaning a breeze.

For commercial spaces like restaurants, warehouses, or retail stores, epoxy flooring provides the added benefit of being stain-resistant and hygienic. In high-traffic environments, epoxy flooring’s resistance to bacteria and mold growth ensures that it remains sanitary with minimal effort. This makes it an ideal choice for spaces that require strict cleanliness, such as healthcare facilities and food preparation areas.

3. Aesthetic Appeal and Customization

Another reason epoxy flooring is gaining traction in Toronto is its aesthetic versatility. Gone are the days when concrete floors were associated with bland, industrial looks. Modern epoxy flooring offers a wide array of design options, from solid colors and metallic finishes to decorative patterns and textures. Homeowners and business owners can choose from a range of customization options that match their personal style or brand image.

In residential homes, particularly in modern and industrial-style designs, epoxy flooring offers a sleek, polished look that complements open-concept layouts and minimalist décor. Many people are opting for high-gloss finishes that reflect light, creating the illusion of more space and adding a touch of luxury to basements, garages, and even kitchens.

For commercial properties, epoxy flooring can be customized with logos, patterns, and other design elements that help create a unique atmosphere. Whether you want a simple, clean look or a bold, statement-making floor, epoxy provides endless possibilities for personalization.

4. Cost-Effectiveness

Toronto is known for its real estate market, and property owners are always looking for ways to maximize value without breaking the bank. Epoxy flooring is relatively affordable compared to other high-end flooring options like marble, hardwood, or tile. While it offers a similar sleek and polished appearance, the cost of installing epoxy flooring is often much lower. Additionally, the long lifespan of epoxy floors means fewer replacement or repair costs over time, making it a cost-effective solution for both residential and commercial spaces.

For businesses in Toronto, the initial investment in epoxy flooring quickly pays off due to its durability and low maintenance requirements. With fewer repairs and less frequent cleaning needed, businesses can save money on long-term upkeep.

5. Sustainability and Environmental Considerations

Sustainability is becoming an increasingly important factor for Toronto homeowners and businesses. Many people are looking for eco-friendly building materials that align with their values of environmental responsibility. Epoxy flooring meets these criteria in several ways. First, epoxy is often applied over an existing concrete surface, eliminating the need for new materials and reducing waste. This makes it an environmentally friendly option compared to other flooring choices that require cutting down trees or mining natural resources.

Additionally, epoxy’s durability means it doesn’t need to be replaced frequently, further reducing the environmental impact. Fewer materials are used over the life of the floor, and less energy is spent on producing, transporting, and installing new flooring materials. For property owners in Toronto who are mindful of their carbon footprint, epoxy flooring is an attractive, sustainable option.

6. Weather Resistance and Suitability for Toronto’s Climate

Toronto’s fluctuating weather conditions, from freezing winters to sweltering summers, require flooring solutions that can withstand these extremes. Epoxy flooring is particularly well-suited to this environment due to its ability to resist moisture, salt, and other weather-related wear. In the winter, when snow, ice, and road salt are brought into garages and basements, epoxy floors are unaffected, maintaining their smooth surface without cracking or staining.

This resistance to environmental damage makes epoxy a smart choice for Toronto homes and businesses, where durability in the face of harsh weather conditions is a must. A professional epoxy flooring contractor in Toronto can ensure that the epoxy is properly installed to withstand the unique challenges posed by the city’s climate.

Epoxy flooring is gaining popularity in Toronto due to its durability, low maintenance, aesthetic versatility, cost-effectiveness, and environmental benefits. Whether for residential or commercial use, epoxy flooring provides a long-lasting, attractive solution that stands up to the rigors of daily life in a bustling, climate-challenged city like Toronto. For anyone considering a flooring upgrade, epoxy offers both practical and visual advantages that make it an ideal choice.

How to get straight teeth at home in London

This is a guide for anyone who is considering opting for straight teeth at home in London.  It contains information on what the treatment involves and how it works.  Teeth that are misaligned can affect a person’s self-confidence, their oral health and the general health of the whole body.  Therefore, it is important to have this issue corrected.

What is the treatment?

The treatment involves moving the teeth into a straight and more uniform position using a type of orthodontics known as Invisalign. Invisalign is the trade name for a type of braces which are completely invisible.  They are made up of transparent trays of super soft plastic that are also known as aligners.

How does the patient get started?

The first step to getting treatment with clear braces at home is for the patient to take some photographs of their teeth.  They send these to the provider to allow them to identify if they have the potential to be a suitable candidate.

If this appears to be the case, then the patient is invited to go for a scan of the teeth and gums.  This is the most up to date method for getting a comprehensive view of the position of the teeth and is used in place of the previous technique of asking the patient to bite down on moulds to take impressions of them.  The scan is conducted in 3D using the best technology available.  It is easy and comfortable, which helps to ensure the patient feels relaxed and at ease.

Suitable candidate

The results of the scan are emailed to the patient with the recommendation of whether they are likely to benefit from wearing invisible braces.  Most people are suitable candidates, and if they are not, then another alternative can be suggested if they want to enjoy the benefits of having straight teeth.

Predicting results

One of the great advantages of this treatment is that the patient can get a good idea of the results they can expect at the end of treatment.  They are given images and a description of how they can expect the teeth to move during the process and are also allocated a time period that should achieve the desired results.

Getting the braces

Once the patient has decided to go ahead and get their smile improved using clear aligners at home, the braces will be ordered.  They are custom made for the teeth of each individual patient.  This tailoring has two benefits.  Firstly, it means that the braces are extremely comfortable to wear which makes life much easier during treatment.  Secondly, the fact that the individual teeth of each individual patient are targeted means that they deliver very impressive results.

Wearing the braces

The patient has the option to have their new aligners delivered to their home or to have a fitting with a professional.  This flexibility gives the advantage of choice alongside expertise when needed.  A special app helps the patient to keep an eye on their progress as time goes by, and to get help and advice whenever they need it.

How braces and aligners have altered expectations

There has always been an interplay between services and expectations; everybody wants to give the best service they can and with it, expectations always grow. When combined with developing better techniques and understanding the fundamentals, a feedback loop is created. This can be seen throughout almost every industry, and with orthodontic care, it certainly has made itself known.

Orthodontic treatment simply means the moving of teeth. It was first referred to in Greek medical manuals that suggested finger pressure over many hours could change tooth location, which is technically true, but it’s pretty inefficient. This has led to lots of tools and gadgets to apply that pressure constantly.

Celebrity standards setting the curve

In the 60s, The Beatles may have been an icon but not for their teeth. Teeth just were not the priority as the free love countercultures defined celebrity! The change may have been gradual, but as pearly whites that were straight and symmetrical became signs of status, it was celebrities that led the way. By the 90s, it was obvious that you could not get away as a celebrity without near-perfect teeth. Some may have taken it one step too far with phosphorescent standards of boy bands and Simon Cowell.

2020’s standards of dentistry amongst celebrities have levelled off albeit at the very top end of what is possible with a healthy dose of photoshop and video editing to boot. Many of these dental goals have moved down to the rest of society, leading people to wonder what they can do to improve the appearance of their teeth; whitening became part of their normal routines, and more adults considered an orthodontist Liverpool more than ever.

Covert treatment options

One of the biggest factors limiting adult orthodontic care, particularly when focused on static goals, is the appearance of wearing braces. Considered infantile and unflattering, many patients simply do not wish to or cannot afford to go through the process of reducing appearance temporarily to reach and assist goals. The obligations of adult life are simply not as flexible as those of high school or full-time education.

Changes in orthodontic practice

Over the same time period from the 60s to today, there has been a big shift in tools from heavy-handed headgear to lighter and thinner braces, with bulky steel archwires being superseded with thin titanium-nickel alloy. With the length of treatments sinking, orthodontic treatment extending more than 2 years was very rare, but historically it was not unheard of.

NHS treatment: then vs. now

It can be easy to forget that the NHS was founded in the late 1940s, and it took a long time to establish the services that many have come to take for granted today. Dentistry was one of the later services; therefore, it is entirely possible for an adult in the 1960s, depending on their economic background, to be completely denied dental care at the most critical stages of their life.

In the more general improvement and, therefore, higher expectations of tooth alignment, there is an expectation of having access to good quality dental care regardless of economic background throughout childhood.

Will I ever have white teeth again?

Of course you will! White teeth are the luck of the draw; you might have the strictest oral hygiene routine and the straightest of teeth, but the things we do, eat and drink don’t pick favourites. If you’re a frequent coffee drinker, wine drinker, or enjoy dark berries, curries and other dark foods, you might have noticed some staining to your teeth or the slightest discolouration. With teeth whitening Harley Street on the come up, though, it has never been easier to get the bright, white smile of your dreams!

Safety tips

Before you dive into the world of whitening and all the different types there are, it is important that you take extra precautions to care for your mouth and gums. No matter the type of treatment you go with, you should always follow any instructions or directions that come with it. These are in place to get you the best possible results without putting yourself in any danger, so it really is a no brainer. After the whitening treatment has finished, be sure to avoid sodas and other acidic foods or beverages that may cause any discomfort. Remember, sensitive teeth after this kind of treatment is completely normal, but you should always take extra care with them! Always talk to your dentist or practitioner if you have any concerns. Finally, don’t overdo it! Your teeth have feelings, too.

Toothpastes and gels

Toothpaste and gels that you can buy over the counter do, of course, offer some teeth lightening benefits, but you won’t get a drastic change as they do not have any bleach in them. If you only want to lift around one shade from your teeth, you might want to try these alternatives before taking the big jump with in-clinic or at home options.

At home whitening

The obvious benefit to at home whitening is that you can do it from the comfort of your home, with directions from the dentist. You’ll be provided with all the necessary things, including your trays and the whitening agent, but there won’t be any supervision and results can essentially vary based on how strictly the directions are followed. Results from this process are usually seen within two weeks. There are also options to have a combination of at home and in-clinic whitening treatments, which may offer more stability and are easier to maintain. Be sure to ask your dentist about all your options and don’t be shy to question anything that raises a concern!

In-clinic options

This whitening treatment is probably the most common, with the best results. You’ll be sitting in the safety of the dental chair and your dentist will do all the heavy lifting, leaving you to reap the benefits. Your dentist will protect your gums before the whitening agent is applied to your teeth. You’ll then be left under a light which will activate the process and instantly begin lifting the shades from your discoloured teeth. After just a few hours, you’ll be able to smile with confidence and your new bright, white smile!

Dental laminates: myths debunked

If you are looking for a way to whiten your smile without using bleach, or to conceal a gap in between your teeth, you may have stumbled across porcelain laminates in your online research for a way to achieve these goals.

While not a new idea, in recent years, veneers Wagga have become increasingly popular among patients and cosmetic dentists to alter the aesthetics of a person’s smile. But with popularity comes myths and misguided information that can deter patients who may benefit from the procedure from seeking it.

Here, some of the most common myths about porcelain laminates are explored so you can learn the truth about this popular and nifty restorative treatment.

Laminates are weak

When many people think of porcelain as a material they visualise cups and plates which are usually weak when exposed to pressure.

However the porcelain that is used to create laminates is sturdy and can rival enamel in many ways. Laminates do not crack easily, and are often used to support teeth that have been weakened by a procedure such as a root canal or to add strength to a tooth that has had a crown or deep filling fitted to it.

Laminates are too expensive for most people to afford

A common concern that many patients have is that porcelain laminates are too expensive for them to afford.

Luckily many dental surgeries who offer this treatment may also be able to offer you financing options or a payment plan, so you can spread out the cost of the treatment into affordable monthly repayments.

Also when you consider how long porcelain laminates will last (up to 15 years with correct care) they are well worth the money spent!

Laminates stain easily

Many patients who are considering laminates are doing so to whiten their smiles. This treatment is very popular among patients whose teeth are too sensitive to undertake traditional whitening methods.

But you may have read that laminates stain easily; this is not true. Porcelain itself is less porous than enamel and as such, it does not stain as easily or as deeply. And so any whitening effects that are created with porcelain laminates are likely to last longer than those achieved with traditional whitening methods such as bleaching.

Laminates hurt when they are fitted

Actually, the fitting of dental laminates is one of the few cosmetic procedures you can undertake at your dentist that will not cause any discomfort at all!

This is because all that has to happen for a laminate to be fitted to your teeth is a minor sanding of the enamel on the tooth to create a rough surface, and the placement of  dental cement. The laminate is then placed onto the cement and the procedure is completed. No needles or numbing agents are required at all! 

Laminates do not last long

As mentioned earlier, with correct aftercare porcelain laminates can easily last for 15 years. The most common issue which can cause them to fall off is gum disease, so you will need to attend biannual check-ups at your dental surgery to keep an eye out for this condition.

DISCLAIMER OFFSITE

Any surgical or invasive procedure carries risks. Before proceeding you should seek a second opinion from an appropriately qualified health practitioner.